
Pi-hole: Network-Wide Ad Blocking for Your Entire Home
Online ads are more than an annoyance. They track you across the web, consume bandwidth, slow down page loads, and occasionally serve malware. Browser extensions like uBlock Origin handle this well — but only in your browser. They do nothing for the ads in your phone's apps, your smart TV's interface, your kid's tablet, or the IoT devices quietly phoning home to telemetry servers.
Photo by Jordan Harrison on Unsplash
Pi-hole blocks ads and trackers at the DNS level, covering every device on your network automatically. Set it up once, point your network's DNS at it, and every device benefits — no per-device configuration needed.
How DNS-Based Ad Blocking Works
Every time a device needs to load something from the internet, it first asks a DNS server to translate a domain name (like ads.example.com) into an IP address. Pi-hole sits in the middle of this process:
- A device on your network requests
ads.doubleclick.net - The request goes to Pi-hole instead of a public DNS server
- Pi-hole checks the domain against its blocklists
- If the domain is on a blocklist, Pi-hole returns a blank response — the ad never loads
- If the domain is legitimate, Pi-hole forwards the query to an upstream DNS resolver (like Cloudflare or Quad9) and returns the real answer
This happens transparently for every device on your network. No software to install on individual devices. No browser extensions needed on your smart TV.
What DNS blocking can and cannot do
Blocks well:
- Banner ads, pop-ups, and interstitials on most websites
- In-app ads on mobile devices (most of them)
- Smart TV ads and telemetry
- Tracking pixels, analytics scripts, and fingerprinting domains
- Known malware and phishing domains
Cannot block:
- Ads served from the same domain as content (YouTube ads, Facebook/Instagram ads, some Reddit ads)
- Ads delivered over encrypted DNS that bypasses your network's resolver (some apps hard-code DNS)
- Ads that use raw IP addresses instead of domain names
DNS-level blocking typically catches 70-80% of ads and trackers. For the remaining 20-30%, a browser ad blocker fills the gap — more on that below.
Pi-hole Features
Pi-hole has evolved well beyond a simple blocklist. Here is what you get:
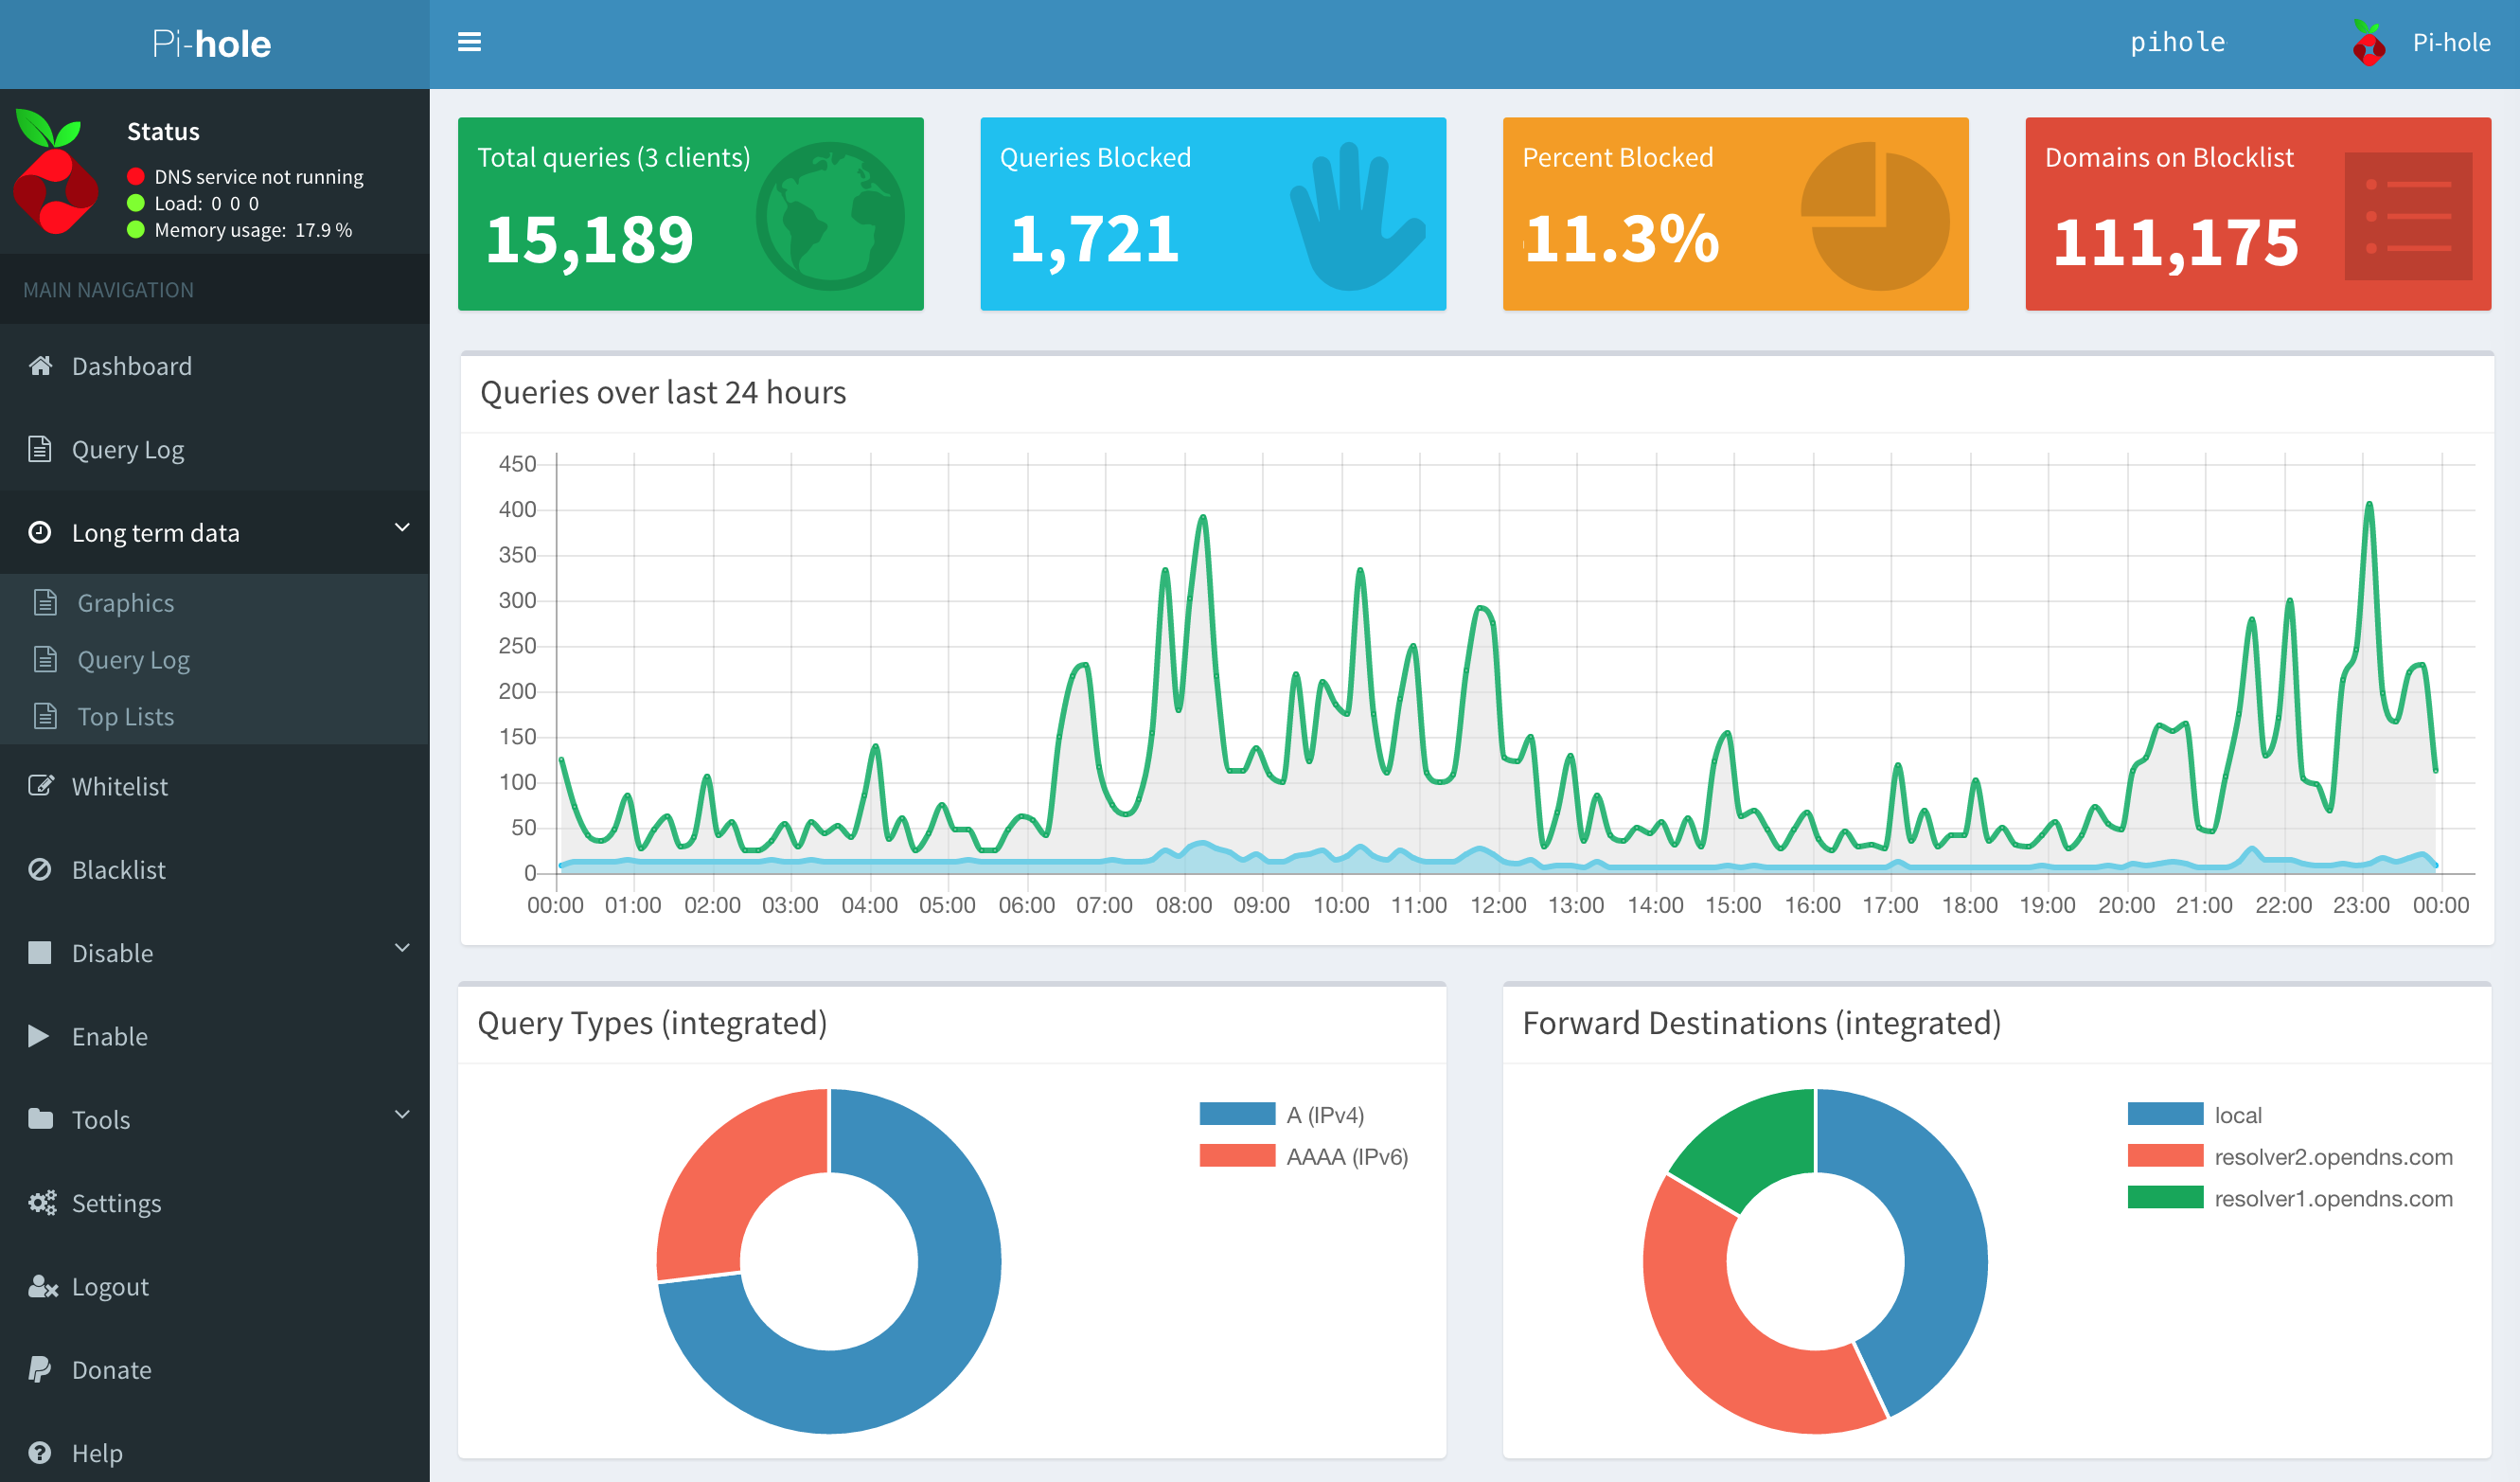
- Web dashboard — Real-time statistics showing total queries, blocked queries, percentage blocked, and top blocked domains. Useful for understanding what your devices are actually doing on the network.
- Query log — Every DNS request from every device, with the ability to whitelist or blacklist domains with one click. Essential for debugging when something breaks.
- DHCP server — Pi-hole can replace your router's DHCP server, which gives it per-device visibility and lets you see which device made which query (rather than all queries appearing to come from your router).
- Regex filtering — Block or allow domains by pattern. For example, block all subdomains matching
.*\.ads\..*ortelemetry\..*without needing to list each one individually. - Group management — Assign different blocklists and rules to different clients. Give your work laptop a permissive config while applying aggressive blocking to IoT devices.
- Gravity (blocklist engine) — Aggregates multiple blocklists into a single optimized database. Updates on a schedule you control.
- API — Full-featured API for automation, monitoring, and integration with tools like Grafana or Home Assistant.
Installation
Option 1: Docker Compose (recommended)
Docker is the cleanest way to run Pi-hole, especially if you are already running other containers.
services:
  pihole:
    image: pihole/pihole:latest
    container_name: pihole
    ports:
      - "53:53/tcp"
      - "53:53/udp"
      - "80:80/tcp"
    environment:
      TZ: "America/New_York"
      WEBPASSWORD: "changeme"
      FTLCONF_dns_upstreams: "1.1.1.1;9.9.9.9"
      FTLCONF_dns_dnssec: "true"
    volumes:
      - ./etc-pihole:/etc/pihole
      - ./etc-dnsmasq.d:/etc/dnsmasq.d
    restart: unless-stopped
docker compose up -d
Open http://your-server-ip/admin and log in with the password you set.
Notes on the configuration:
WEBPASSWORD— Set this to something strong. You can also generate a random one and retrieve it from the logs on first boot.FTLCONF_dns_upstreams— Your upstream DNS resolvers. Cloudflare (1.1.1.1) and Quad9 (9.9.9.9) are solid, privacy-respecting defaults.FTLCONF_dns_dnssec— Enables DNSSEC validation, which protects against DNS spoofing.- Port 80 is for the web dashboard. If you have another service on port 80, remap it (e.g.,
8080:80).
Option 2: Bare metal install
Pi-hole provides a one-line installer for Debian, Ubuntu, Fedora, and CentOS:
curl -sSL https://install.pi-hole.net | bash
The installer walks you through choosing upstream DNS, selecting default blocklists, and setting an admin password. It installs Pi-hole's FTL DNS engine, the web interface, and a command-line tool (pihole).
If you prefer to review the script before running it (you should):
curl -sSL https://install.pi-hole.net -o install.sh
less install.sh
sudo bash install.sh
The bare metal install is a good choice for dedicated hardware like a Raspberry Pi where you want Pi-hole to own the system.
Want more networking guides? Get guides like this in your inbox — Self-Hosted Weekly delivers one free deep-dive every week.
Initial Configuration
Upstream DNS servers
Choose privacy-respecting upstream resolvers. Avoid using your ISP's DNS servers — they often log queries and may inject ads themselves.
| Provider | Primary | Secondary | Notes |
|---|---|---|---|
| Cloudflare | 1.1.1.1 | 1.0.0.1 | Fast, privacy-focused |
| Quad9 | 9.9.9.9 | 149.112.112.112 | Blocks known malware domains |
| Mullvad | 194.242.2.2 | — | No logging, Sweden-based |
Blocklists
Pi-hole ships with a default blocklist (Steven Black's list) that covers about 80,000 domains. This is a reasonable starting point, but you can add more for better coverage.
Recommended additions:
| List | Focus | Approximate size |
|---|---|---|
| OISD Full | Comprehensive, community-curated | ~150,000 domains |
| Hagezi Pro | Balanced blocking, very few false positives | ~120,000 domains |
| Hagezi TIF (Threat Intelligence Feeds) | Malware, phishing, coin mining | ~70,000 domains |
Add blocklists in the Pi-hole dashboard under Adlists. After adding, run pihole -g (or click "Update Gravity" in the dashboard) to pull and process the new lists.
A word of caution: more lists means more potential false positives. Start with the default list plus one or two others. Add more only if you feel coverage is lacking. Going from 80,000 to 500,000 blocked domains does not meaningfully improve your experience — it mostly increases the chance of breaking something.
Whitelist essentials
Some domains get blocked by aggressive lists but are needed for common services to function. You will likely need to whitelist some of these:
s.youtube.com— YouTube history and watch progressclients4.google.com— Android connectivity checkscdn.optimizely.com— Some sites break without this (A/B testing)captcha.guard.cloudflare.com— Cloudflare CAPTCHAs- Various Microsoft domains if you use Office 365 or Xbox services
The best approach: start with no whitelist, use your network normally for a day, and then check the query log for anything that is being blocked that should not be. Pi-hole's query log makes this straightforward — you can whitelist a domain with one click.
Common Gotchas and Debugging
A website or app stops working
This is the most common issue. When it happens:
- Open the Pi-hole dashboard and go to Query Log
- Filter by the device having the issue (if you know its IP)
- Look for red (blocked) entries around the time the problem occurred
- Try whitelisting the blocked domain and test again
- If you are not sure which blocked domain is causing the issue, temporarily disable Pi-hole for a few minutes (
pihole disable 5m) and see if the problem resolves
Smart TVs and devices that hard-code DNS
Some devices (notably Chromecast, some smart TVs, and certain IoT gadgets) ignore your network's DNS settings and send queries directly to Google's 8.8.8.8 or another hard-coded resolver. Pi-hole cannot block these queries because it never sees them.
The fix: configure your router's firewall to intercept all outbound DNS traffic (port 53) and redirect it to your Pi-hole server. This forces even hard-coded DNS through your filter. The exact method varies by router firmware.
Queries showing as coming from one IP
If all queries in your log appear to come from your router's IP rather than individual devices, your router is proxying DNS requests. To see per-device queries, either:
- Configure your router to use Pi-hole as its DNS server without proxying (varies by router)
- Enable Pi-hole's built-in DHCP server and disable your router's DHCP, so devices get their DNS directly from Pi-hole
Pi-hole vs Browser Ad Blockers
Pi-hole and browser ad blockers like uBlock Origin are not competitors — they are complementary layers.
| Capability | Pi-hole | uBlock Origin |
|---|---|---|
| Blocks ads in browsers | Yes (most) | Yes (nearly all) |
| Blocks ads in apps | Yes | No |
| Blocks ads on smart TVs | Yes | No |
| Blocks same-domain ads (YouTube) | No | Yes |
| Cosmetic filtering (hides ad placeholders) | No | Yes |
| Per-element blocking | No | Yes |
| Covers all network devices | Yes | No |
| Requires installation per device | No | Yes |
The recommended setup: Run Pi-hole on your network for broad, device-agnostic blocking, and install uBlock Origin in your browsers for the ads that slip through DNS filtering. Together, they catch nearly everything.
Pi-hole vs AdGuard Home
Both are excellent DNS-based ad blockers. If you are choosing between them, here are the practical differences:
| Feature | Pi-hole | AdGuard Home |
|---|---|---|
| Project age | Since 2014, very mature | Since 2018, actively developed |
| Community | Larger, more third-party guides | Large and growing |
| Web interface | Functional, information-dense | More modern design |
| DNS-over-HTTPS/TLS | Requires separate setup | Built-in |
| Per-client rules | Via group management | Built-in, simpler UI |
| Safe browsing / parental | Not built-in | Built-in |
| Deployment | Docker or bare metal installer | Single binary or Docker |
| DHCP server | Yes | Yes |
| Regex filtering | Yes | Yes |
| API | Yes | Yes |
Summary: AdGuard Home has a more modern interface and includes encrypted DNS and parental controls out of the box. Pi-hole has a larger community, more third-party documentation, and a longer track record. If you want encrypted DNS without extra work, AdGuard Home is slightly easier to set up. If you value community support and ecosystem maturity, Pi-hole has the edge. Both are free, both work well, and switching between them is not difficult.
Hardware Requirements
Pi-hole is remarkably lightweight. It was originally designed to run on a Raspberry Pi Zero — and it still can.
| Requirement | Minimum | Recommended |
|---|---|---|
| RAM | 512 MB | 1 GB |
| CPU | Any (1 GHz single-core) | Any modern CPU |
| Storage | 2 GB | 4 GB+ (logs grow over time) |
| Network | 100 Mbps Ethernet | Gigabit Ethernet |
| OS | Debian, Ubuntu, Fedora, CentOS, or Docker | Same |
In practice, Pi-hole uses about 50-80 MB of RAM and negligible CPU during normal operation. It handles thousands of queries per second without breaking a sweat. A Raspberry Pi 3/4/5, an old laptop, or a small VM on an existing server all work perfectly.
Tip: Use a wired Ethernet connection, not WiFi. Your DNS server should be as fast and reliable as possible. A WiFi hiccup means your entire network stalls on DNS lookups.
Encrypted DNS with Pi-hole
By default, Pi-hole forwards queries to upstream resolvers over plain, unencrypted DNS. This means your ISP (or anyone on the network path) can see every domain you query. To fix this, you can add an encrypted DNS proxy between Pi-hole and the upstream resolver.
Option 1: cloudflared (DNS-over-HTTPS)
Run Cloudflare's cloudflared proxy alongside Pi-hole. It accepts plain DNS from Pi-hole on localhost and forwards it to Cloudflare's DoH endpoint over HTTPS.
services:
  pihole:
    image: pihole/pihole:latest
    container_name: pihole
    ports:
      - "53:53/tcp"
      - "53:53/udp"
      - "80:80/tcp"
    environment:
      TZ: "America/New_York"
      WEBPASSWORD: "changeme"
      FTLCONF_dns_upstreams: "127.0.0.1#5053"
    volumes:
      - ./etc-pihole:/etc/pihole
      - ./etc-dnsmasq.d:/etc/dnsmasq.d
    network_mode: host
    restart: unless-stopped

  cloudflared:
    image: cloudflare/cloudflared:latest
    container_name: cloudflared
    command: proxy-dns --port 5053 --upstream https://1.1.1.1/dns-query --upstream https://1.0.0.1/dns-query
    network_mode: host
    restart: unless-stopped
Pi-hole sends queries to cloudflared on port 5053, which encrypts them and sends them to Cloudflare over HTTPS. Your ISP sees HTTPS traffic to 1.1.1.1, but cannot read the DNS queries.
Option 2: Unbound (recursive resolver)
Instead of forwarding to a public resolver at all, you can run Unbound as a recursive DNS resolver. Unbound queries the authoritative DNS servers directly, cutting out the middleman entirely. No third party sees your full query stream.
This is the most private option: instead of asking Cloudflare "what is the IP for news.ycombinator.com?", Unbound asks the root servers, then the .com servers, then the ycombinator.com servers directly. No single upstream provider sees all your queries.
The trade-off is slightly higher latency on the first lookup for each domain (subsequent lookups are cached). In practice, you rarely notice the difference.
Pi-hole's documentation includes a detailed guide for setting up Unbound alongside Pi-hole, and there are well-maintained Docker images for Unbound as well.
Verdict
Pi-hole is a great fit if:
- You want ad blocking across every device on your network without installing anything per-device
- You have smart TVs, IoT devices, phones, tablets, or family members who will not install ad blockers
- You value the large community, extensive documentation, and mature ecosystem
- You want visibility into what your devices are doing on the network via the query log
- You are running a Raspberry Pi or any small Linux box that needs a job
Pi-hole might not be necessary if:
- You only use one device with uBlock Origin and don't care about other devices
- Your primary concern is YouTube or Facebook ads (DNS blocking cannot reliably handle these)
- You are on a network where you cannot change DNS settings
The bottom line: Pi-hole is one of the most impactful self-hosting projects you can run. The setup takes 15-20 minutes, it runs on hardware you probably already have, and every device on your network benefits immediately. Pair it with uBlock Origin in your browsers for comprehensive coverage, and you will wonder how you ever tolerated the ad-riddled internet.